There are many things to do when listing a property for sale, and it doesn’t matter whether you are the homeowner or a realtor. In today’s internet age, adding attractive photographs to your listings is crucial since you need to capture the hearts and minds of a potential buyer to quickly close a sale. As easy as photography may seem, many constantly make errors that prevent them from experiencing the benefits of real estate photography. Fortunately, this article offers some simple ways to improve your real estate photography. 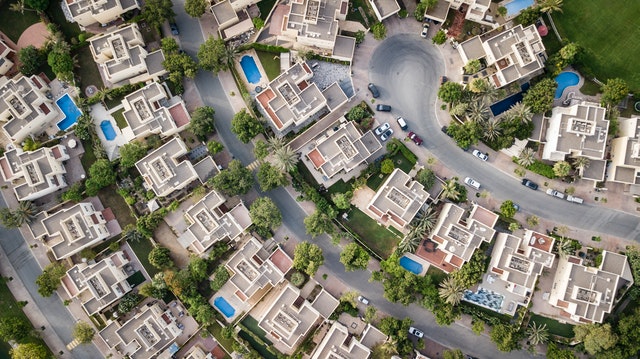
1. Hire a professional photographer
Hiring a professional photographer can eliminate stress and ensure that you produce exceptional images for a homeowner or realtor. A professional photographer can help you with the right set of photos to sell on your property on social media and real estate platforms. You can schedule time with the photographer and highlight areas you feel are important. However, it is easy to confuse real estate photographers with architectural photographers. The latter has a different focus and charges slightly higher. This wouldn’t feel like the typical tip for improving your photography but can help avoid hiring the wrong person for the job.
2 Walkthrough the property before shooting
Regardless of your photography skill and experience, every home is different. Therefore, you should consider taking a look around the property to gain a feel of the property and get some shooting ideas before getting to work. While walking through the property, you can imagine the best angles and the required items for good real estate photography. Additionally, you can determine the available spaces, areas that require a bit of tidying up, and the order in which you’ll want the photographs.
3. Prepare the night before
Preparation is key for success in real estate photography. Imagine getting to the site only to realize something isn’t working or is missing. Although you may proceed, you may have to spend more time completing a shoot or not get the results you were looking for. Prepare your gear the night before and carry along your charger to avoid this. If possible, carry along a secondary camera. Preparation may include formatting your memory card, charging all your batteries, and packing up. It can be useful to look up the address of your shoot destination to schedule your drive time.
4 Get a good camera and use a tripod
Nearly every modern DSLR can pass as a good camera for your real estate photography. However, you can rely on your smartphone in some extreme cases. Remember that these photos will be used to sell a property and can be significant for how much you earn on a property. While your smartphone can take some really good selfies, it may not offer the flexibility you need for taking dynamic photographs of the property’s interior. You may want to hire a DSLR if you don’t own one or borrow a good camera for a shoot. Even for the best DSLR, you need a tripod to stabilize the camera and take clean shots.
5 Get a drone for aerial images
If you are looking to start a career in real estate photography, you can begin with a budget camera, a tripod, and a flash. You only have to make sure they are in good condition. However, you may want to invest in a drone to get aerial with your real estate photography. Drone photography is an excellent way to take stunning images of your property’s exterior from above. Aerial photos can reveal the entire property and its surrounding areas to give potential buyers a complete sense of the property. It can be useful to learn more about the various drones and their flight experiences.
6 Avoid irrelevant subject matters
Some things won’t sell your property. For instance, a potential buyer may have little or no interest in seeing inside a closet, a messy garage, or a laundry room. It is okay to skip rooms that may affect the overall impression of the property. This means focusing on the property’s strength and making sure to compose your best pictures around those areas. Since you are not documenting the estate for insurance reasons, make sure the pictures fuel a buyer’s dreams and inspire them to get futuristic.
7 Decide to keep your lights on or off
There are many good reasons to keep the lights on or otherwise when taking real estate photographs. Keeping the lights on can make your space feel warmer and welcoming. However, it can introduce different color temperatures that may require adjusting later. Switching off the lights can create an even light temperature, although it gives a cold vibe in real estate images. It can be helpful to consider the needs of every property. You can decide to let in more natural lights when the property has large windows. Despite this, natural lights can offer the best effects in most circumstances.
8 Stage the property
Staging the property doesn’t mean spending thousands on fake fixtures to dress the home. It could be as simple as mowing the lawn, raking the leaves, or stowing away your garbage cans. Giving your home a good cleaning and tidying up can do wonders for your first impressions. Stash away the remote controllers and close your toilet lids. These are easy ways to create valuable impressions, increase the first price offers, and close sales.
9 Shoot from corners
The home layout can make or break a sale, and if it isn’t shown well in the listing photographs, buyers may not look further past the first impression. You will miss the chance to showcase the entire layout of a property when you focus on only squared walls in the property. Taking that approach means you will have to take more pictures, yet you only have a few seconds to capture a buyer’s attention. So it is crucial to offer more details with fewer photos.
While real estate photography can be a reliable way to earn some income, it is likewise one of the best and fastest approaches for closing a sale. Real estate photography requires consistency with listing and look and not necessarily your equipment. Consider the tips mentioned above for the best real estate pictures for a full, consistent portfolio.